
Disabling Secure Boot would be required for example in order to enable Test Mode for Windows if you received the "The value is protected by Secure Boot policy" error, in some cases if you want to install a specific Linux OS or if you want to install Windows 7. Enabling Secure Boot is required in order to install Windows 11. The exact location and procedure to enable or disable Secure Boot can vary depending on BIOS version and motherboard generation.
- 08 Apr 2025: Updated the "Precautionary notices" sections.
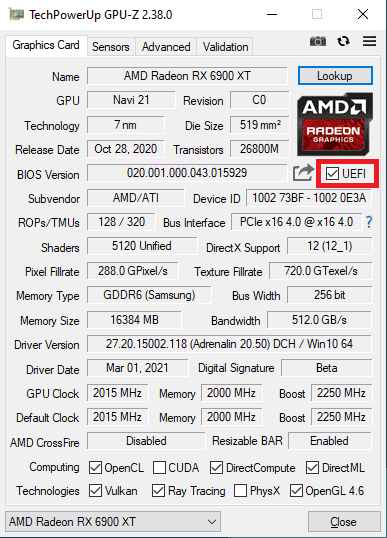
- 23 May 2022: Article updated with a precautionary notice about checking if GPU BIOS has UEFI support, which may have been a cause of black screens.
- 30 Jun 2021: Article updated with a precautionary notice about boot disk being GPT partition style.
- 17 May 2020: Article published.
Generic instructions
Disable Secure Boot
- Enter the BIOS:
- Reboot system and press Del repeatedly at system start. Some OEM PC(HP, Dell, Acer, Lenovo, Toshiba etc.) and notebooks use keys like F1, F2, F8, F10 or F12 for entering BIOS.
- If that does not work, go in Windows, hold the "Shift" key and select Restart from the Start Menu. After restart, the Advanced Startup menu options will appear. Go to Troubleshoot > Advanced options > UEFI Firmware Settings and press Restart.
- Look for "Secure Boot" option under under Boot, Security or Authentication menu categories.
- Set "Secure Boot" to Disabled.
- Save and exit.
Enable Secure Boot
! Precautionary notices
If you haven't had Secure Boot enabled before in your current system, before enabling Secure Boot do the following checks:
- Check if your GPU BIOS has UEFI support. You can do this in GPU-Z and see if UEFI checkbox is ticked. If it is not ticked, then your system will not boot, only showing a black screen and may require you to do a external BIOS reset (clear CMOS pins on the motherboard or temporarily removing the motherboard battery).
- If you want to boot an existing Windows installation with Secure Boot, check if your disk has an EFI partition, or if it has an EFI folder on system partition or any other partition. This is usually created when installing Windows. If you get a blue screen during boot, the EFI BCD file might be misconfigured and you to use EasyBCD to change to boot configuration of the "\EFI\Microsoft\Boot\BCD" file to point to the proper Windows drive from which Windows will boot.
- Check if your boot disk partition style is GPT. See "Checking MBR or GPT partition style" of this guide. If it's MBR then your OS will probably not boot.
Enable Secure Boot guide
- Enter the BIOS:
- Reboot system and press Del repeatedly at system start. Some OEM PC(HP, Dell, Acer, Lenovo, Toshiba etc.) and notebooks use keys like F1, F2, F8, F10 or F12 for entering BIOS.
- If that does not work, go in Windows, hold the "Shift" key and select Restart from the Start Menu. After restart, the Advanced Startup menu options will appear. Go to Troubleshoot > Advanced options > UEFI Firmware Settings and press Restart.
- Look for "Secure Boot" option under under Boot, Security or Authentication menu categories.
- Set "Secure Boot" to Enabled.
- Save and exit.
ASRock motherboards
Disable Secure Boot
- Enter the BIOS:
- Reboot system and press Del repeatedly at system start.
- If that does not work, go in Windows, hold the "Shift" key and select Restart from the Start Menu. After restart, the Advanced Startup menu options will appear. Go to Troubleshoot > Advanced options > UEFI Firmware Settings and press Restart.
- Switch to "Advanced Mode" if the BIOS is in "Easy Mode".
- Go to Security-> set "Secure Boot" to Disabled.
- Save and exit.
Enable Secure Boot
! Precautionary notices
If you haven't had Secure Boot enabled before in your current system, before enabling Secure Boot do the following checks:
- Check if your GPU BIOS has UEFI support. You can do this in GPU-Z and see if UEFI checkbox is ticked. If it is not ticked, then your system will not boot, only showing a black screen and may require you to do a external BIOS reset (clear CMOS pins on the motherboard or temporarily removing the motherboard battery).
- If you want to boot an existing Windows installation with Secure Boot, check if your disk has an EFI partition, or if it has an EFI folder on system partition or any other partition. This is usually created when installing Windows. If you get a blue screen during boot, the EFI BCD file might be misconfigured and you to use EasyBCD to change to boot configuration of the "\EFI\Microsoft\Boot\BCD" file to point to the proper Windows drive from which Windows will boot.
- Check if your boot disk partition style is GPT. See "Checking MBR or GPT partition style" of this guide. If it's MBR then your OS will probably not boot.
Enable Secure Boot guide
- Enter the BIOS:
- Reboot system and press Del repeatedly at system start.
- If that does not work, go in Windows, hold the "Shift" key and select Restart from the Start Menu. After restart, the Advanced Startup menu options will appear. Go to Troubleshoot > Advanced options > UEFI Firmware Settings and press Restart.
- Switch to "Advanced Mode" if the BIOS is in "Easy Mode".
- Go to Boot->CSM(Compatibility Support Module)-> set CSM to Disabled.
- Save and exit.
- Enter BIOS.
- Go to Security and set "Secure Boot" to Enabled.
- Save and exit.
ASUS motherboards
Disable Secure Boot
- Enter the BIOS:
- Reboot system and press Del repeatedly at system start.
- If that does not work, go in Windows, hold the "Shift" key and select Restart from the Start Menu. After restart, the Advanced Startup menu options will appear. Go to Troubleshoot > Advanced options > UEFI Firmware Settings and press Restart.
- Switch to "Advanced Mode" if the BIOS is in "Easy Mode".
- Go to Boot > Secure Boot > Key Management-> Clear Secure Boot keys-> Yes.
- Go to Boot > Secure Boot, it should show that Secure Boot is disabled.
- Save and exit.
Enable Secure Boot
! Precautionary notices
If you haven't had Secure Boot enabled before in your current system, before enabling Secure Boot do the following checks:
- Check if your GPU BIOS has UEFI support. You can do this in GPU-Z and see if UEFI checkbox is ticked. If it is not ticked, then your system will not boot, only showing a black screen and may require you to do a external BIOS reset (clear CMOS pins on the motherboard or temporarily removing the motherboard battery).
- If you want to boot an existing Windows installation with Secure Boot, check if your disk has an EFI partition, or if it has an EFI folder on system partition or any other partition. This is usually created when installing Windows. If you get a blue screen during boot, the EFI BCD file might be misconfigured and you to use EasyBCD to change to boot configuration of the "\EFI\Microsoft\Boot\BCD" file to point to the proper Windows drive from which Windows will boot.
- Check if your boot disk partition style is GPT. See "Checking MBR or GPT partition style" of this guide. If it's MBR then your OS will probably not boot.
Enable Secure Boot guide
- Enter the BIOS:
- Reboot system and press Del repeatedly at system start.
- If that does not work, go in Windows, hold the "Shift" key and select Restart from the Start Menu. After restart, the Advanced Startup menu options will appear. Go to Troubleshoot > Advanced options > UEFI Firmware Settings and press Restart.
- Switch to "Advanced Mode" if the BIOS is in "Easy Mode".
- Go to Boot-> CSM(Compatibility Support Module)-> set "Launch CSM" to Disabled.
- Save and exit.
- Enter BIOS.
- Go to Boot > Secure Boot > Key Management-> "Restore DB Defaults".
- Go to Boot > Secure Boot, it should show that Secure Boot is enabled.
- Save and exit.
BIOSTAR motherboards
Disable Secure Boot
- Enter the BIOS:
- Reboot system and press Del repeatedly at system start.
- If that does not work, go in Windows, hold the "Shift" key and select Restart from the Start Menu. After restart, the Advanced Startup menu options will appear. Go to Troubleshoot > Advanced options > UEFI Firmware Settings and press Restart.
- Go to Security ->Secure Boot-> Set "Secure Boot" to Disabled.
- Save and exit.
Enable Secure Boot
! Precautionary notices
If you haven't had Secure Boot enabled before in your current system, before enabling Secure Boot do the following checks:
- Check if your GPU BIOS has UEFI support. You can do this in GPU-Z and see if UEFI checkbox is ticked. If it is not ticked, then your system will not boot, only showing a black screen and may require you to do a external BIOS reset (clear CMOS pins on the motherboard or temporarily removing the motherboard battery).
- If you want to boot an existing Windows installation with Secure Boot, check if your disk has an EFI partition, or if it has an EFI folder on system partition or any other partition. This is usually created when installing Windows. If you get a blue screen during boot, the EFI BCD file might be misconfigured and you to use EasyBCD to change to boot configuration of the "\EFI\Microsoft\Boot\BCD" file to point to the proper Windows drive from which Windows will boot.
- Check if your boot disk partition style is GPT. See "Checking MBR or GPT partition style" of this guide. If it's MBR then your OS will probably not boot.
Enable Secure Boot guide
- Enter the BIOS:
- Reboot system and press Del repeatedly at system start.
- If that does not work, go in Windows, hold the "Shift" key and select Restart from the Start Menu. After restart, the Advanced Startup menu options will appear. Go to Troubleshoot > Advanced options > UEFI Firmware Settings and press Restart.
- Go to Advanced-> CSM Configuration-> Set "CSM Support" to Disabled.
- Save and exit.
- Enter BIOS.
- Go to Security ->Secure Boot-> Set "Secure Boot" to Enabled.
- Save and exit.
Gigabyte motherboards
Disable Secure Boot
- Enter the BIOS:
- Reboot system and press Del repeatedly at system start.
- If that does not work, go in Windows, hold the "Shift" key and select Restart from the Start Menu. After restart, the Advanced Startup menu options will appear. Go to Troubleshoot > Advanced options > UEFI Firmware Settings and press Restart.
- Switch to "Advanced Mode" if the BIOS is in "Easy Mode".
- Go to Boot and set "Secure Boot" to Disabled.
- Save and exit.
Enable Secure Boot
! Precautionary notices
If you haven't had Secure Boot enabled before in your current system, before enabling Secure Boot do the following checks:
- Check if your GPU BIOS has UEFI support. You can do this in GPU-Z and see if UEFI checkbox is ticked. If it is not ticked, then your system will not boot, only showing a black screen and may require you to do a external BIOS reset (clear CMOS pins on the motherboard or temporarily removing the motherboard battery).
- If you want to boot an existing Windows installation with Secure Boot, check if your disk has an EFI partition, or if it has an EFI folder on system partition or any other partition. This is usually created when installing Windows. If you get a blue screen during boot, the EFI BCD file might be misconfigured and you to use EasyBCD to change to boot configuration of the "\EFI\Microsoft\Boot\BCD" file to point to the proper Windows drive from which Windows will boot.
- Check if your boot disk partition style is GPT. See "Checking MBR or GPT partition style" of this guide. If it's MBR then your OS will probably not boot.
Enable Secure Boot guide
- Enter the BIOS:
- Reboot system and press Del repeatedly at system start.
- If that does not work, go in Windows, hold the "Shift" key and select Restart from the Start Menu. After restart, the Advanced Startup menu options will appear. Go to Troubleshoot > Advanced options > UEFI Firmware Settings and press Restart.
- Switch to "Advanced Mode" if the BIOS is in "Easy Mode".
- Go to Boot and set "CSM Support" to Disabled.
- Save and exit.
- Enter BIOS.
- Go to Boot and set "Secure Boot" to Enabled.
- Save and exit.
MSI motherboards
Disable Secure Boot
- Enter the BIOS:
- Reboot system and press Del repeatedly at system start.
- If that does not work, go in Windows, hold the "Shift" key and select Restart from the Start Menu. After restart, the Advanced Startup menu options will appear. Go to Troubleshoot > Advanced options > UEFI Firmware Settings and press Restart.
- Switch to "Advanced Mode" if the BIOS is in "Easy Mode".
- Go to "Advanced"-> "Settings"-> "Windows OS Configuration"->Secure Boot-> set "Secure Boot" to Disabled.
- Save and exit.
Enable Secure Boot
! Precautionary notices
If you haven't had Secure Boot enabled before in your current system, before enabling Secure Boot do the following checks:
- Check if your GPU BIOS has UEFI support. You can do this in GPU-Z and see if UEFI checkbox is ticked. If it is not ticked, then your system will not boot, only showing a black screen and may require you to do a external BIOS reset (clear CMOS pins on the motherboard or temporarily removing the motherboard battery).
- If you want to boot an existing Windows installation with Secure Boot, check if your disk has an EFI partition, or if it has an EFI folder on system partition or any other partition. This is usually created when installing Windows. If you get a blue screen during boot, the EFI BCD file might be misconfigured and you to use EasyBCD to change to boot configuration of the "\EFI\Microsoft\Boot\BCD" file to point to the proper Windows drive from which Windows will boot.
- Check if your boot disk partition style is GPT. See "Checking MBR or GPT partition style" of this guide. If it's MBR then your OS will probably not boot.
Enable Secure Boot guide
- Enter the BIOS:
- Reboot system and press Del repeatedly at system start.
- If that does not work, go in Windows, hold the "Shift" key and select Restart from the Start Menu. After restart, the Advanced Startup menu options will appear. Go to Troubleshoot > Advanced options > UEFI Firmware Settings and press Restart.
- Switch to "Advanced Mode" if the BIOS is in "Easy Mode".
- If you want to enable Secure Boot: "Advanced"-> "Settings"-> "Windows OS Configuration"-> look for "Windows 8/8.1 Feature" or "Windows 10 WHQL Support" and set it to "UEFI".
- Save and exit.
- Enter BIOS.
- Go to "Advanced"-> "Settings"-> "Windows OS Configuration"->Secure Boot-> set "Secure Boot" to Enabled.
- Save and exit.
Acer PCs and notebooks
Disable Secure Boot
- Enter the BIOS:
- Reboot system and press Del repeatedly at system start.
- If that does not work, go in Windows, hold the "Shift" key and select Restart from the Start Menu. After restart, the Advanced Startup menu options will appear. Go to Troubleshoot > Advanced options > UEFI Firmware Settings and press Restart.
- Go to Boot section, set "Secure Boot" to Disabled.
- If the option is not there look under Authentication section-> Set "Secure Boot" to Disabled.
- Save and exit.
Enable Secure Boot
! Precautionary notices
If you haven't had Secure Boot enabled before in your current system, before enabling Secure Boot do the following checks:
- Check if your GPU BIOS has UEFI support. You can do this in GPU-Z and see if UEFI checkbox is ticked. If it is not ticked, then your system will not boot, only showing a black screen and may require you to do a external BIOS reset (clear CMOS pins on the motherboard or temporarily removing the motherboard battery).
- If you want to boot an existing Windows installation with Secure Boot, check if your disk has an EFI partition, or if it has an EFI folder on system partition or any other partition. This is usually created when installing Windows. If you get a blue screen during boot, the EFI BCD file might be misconfigured and you to use EasyBCD to change to boot configuration of the "\EFI\Microsoft\Boot\BCD" file to point to the proper Windows drive from which Windows will boot.
- Check if your boot disk partition style is GPT. See "Checking MBR or GPT partition style" of this guide. If it's MBR then your OS will probably not boot.
Enable Secure Boot guide
- Enter BIOS:
- Reboot system and press Del repeatedly at system start.
- If that does not work, go in Windows, hold the "Shift" key and select Restart from the Start Menu. After restart, the Advanced Startup menu options will appear. Go to Troubleshoot > Advanced options > UEFI Firmware Settings and press Restart.
- Go to Boot section, set "Boot Mode" to UEFI.
- Save and exit.
- Enter BIOS.
- Go to Boot section, set "Secure Boot" to Enabled.
- If the option is not there look under Authentication section-> Set "Secure Boot" to Enabled.
- Save and exit.
- Windows 8, Windows 8.1, Windows 10, Windows 11, Windows Server 2012, Windows Server 2016, Windows Server 2019.
This is not very helpful "If you haven't had this set to "UEFI" before, your OS will not boot if your disk partition style is MBR and not GPT" settings for MSI motherboards.
how to solve this? Also you need a platform Key (PK) . But its unclear how to get one.
Which specific motherboard do you have? If you can, please take a screenshot or picture with the settings where Platform Key setting is and upload it to image service(imgur,imgbb, etc.).
Here is a guide on how to check if your boot partition style is MBR or GPT and how to convert it to GPT.
Hi, i just tried out the method and now the pc won't boot at all, it just display a black screen and doing nothing i can't access the bios too
Which motherboard do you have? Which version of Windows? How did you enter the BIOS prior to this issue?
At the moment I'm not sure what is going on. Think you need to reset the BIOS settings.
I just recently followed this to enable secure boot in my motherboard, after enabling it though I can't seem to boot back into the bios I also followed the part where you press restart and hold shift and go to uefi firmware, but it just restarts and does the same thing and boots instantly back to windows. Pressing F2 or Del or F12 does not work anymore and just instantly boots back into Windows any fix? or should I just do a CMOS reset on my motherboard?
Which motherboard or notebook do you have? What is you complete version of Windows? Really weird issue, I think this could be a bug within your motherboard BIOS or Windows.
Things to try:
a. Disable Windows 10 Fast Startup https://help.uaudio.com/hc/en-us/articles/213195423-How-To-Disable-Fast-Startup-in-Windows-10
b. Disconnect the system from the power cable and battery if you have notebook. Try to enter the BIOS by pressing the BIOS key (Del/F2/F10/F12 etc.).
c. Disconnect the system from the power cable and batter if you have notebook. Temporarily remove the boot storage drive, connect the power and try to enter the BIOS by pressing the BIOS key (Del/F2/F10/F12 etc.).
d. Reset the BIOS.
For b), c) and d) methods, once you get back in BIOS, if you still want to keep Secure Boot enabled, look for a setting called Fast Boot or something along those lines and set it to disabled. See if entering BIOS with Secure Boot enabled works then.
Let me know how it goes.
I did a CMOS reset using my manual. I have a A320m-ds2 gigabyte motherboard. Located the two pins and it worked! I just got back into the BIOS and I can now successfully use F12 to boot back into it. Thanks for the help!
Before the BIOS reset, have you tried to disable Windows 10 Fast Startup to see if that would allow you to enter the BIOS?
Hi guys at Maxedtech
I tried a YouTube guide on how to install windows 11 by fixing the tpm and secure boot issues that are plaguing those of us that build the own pc and want to upgrade safely from MS. So I followed the tutorial and managed to fix the tpm 2.0 issue, but unfortunately every time I try the secure boot method the bios saves and returns to the bios screen every time no matter if I follow all the video guides step by step. Some said is thanks to MSI issues. My mobo is a X570-A pro, running a Ryzen 5 1600 ,gpu Radeon RX 590
Same issue with me. I have an MSI motherboard. I got TPM enabled ok. Then moved to enable Secure Boot. Now my PC won't boot and won't display the BIOS no matter what I try. I guess I'll have to reset my BIOS back to default so I can get back into it!
What is Microsoft doing with all these new settings. Are they necessary?
Don't know why this is happening and especially why you can't even get into the BIOS.
Before you've enabled Secure Boot, did you check if the system disk partition style is GPT (like it's presented "Checking MBR or GPT partition style" of this guide)?
For Windows 11 installation, there is a way to bypass the Secure Boot requirement by modifying the Windows 11 installation files with a tool like Ventoy (guide here).
Thank you so much. Helpful.
hi, I have a lenovo motherboard, but you did not explain the solution of lenovo here, could you please tell me?
At the moment I don't have specific instructions for Lenovo PC's or notebooks. The "Generic instructions" section might be of help to you.
For ASRock have to add change standard to custom --> then install default factory keys
Then say yes to the onscreen prompts and F10 to Save and exit.